At a recent training event, students participated in a session on primary search with a thermal imager (TI). The session did not include live fire, so everything was the same temperature. To provide “energy” to the “victims,” hand, toe warmers were used and taped to mannequins. This simple technique helped to highlight the “victims” against the cool room. Keep in mind when using this technique, that if this had been a real fire, the victim may not be the warmest object in the room.
I’m familiar with a fire department that is very proactive when it comes to their TI training. They are so proactive, that they have created “a sauna for dummies” to experience the realism of conducting search and rescue and victim location training. This month, for your in-house fire department training, if you do not have access to a heated room or sauna then get some hand & toe warmers and practice searching for a “victim”. Tape a hand warmer to a small mannequin or a couple of the warmers to a larger “victim”. Hide the “victims” around a dark room like the bunkroom and use some blankets to partially cover your victim(s). The goal here is to add as much realism as possible. Have members take turns using the TI to perform a primary search.
Another good thermal imaging camera training drill is called a coordination exercise. With the aid of a smoke machine, smoke up a room, but before you do, be sure to place an axe and halligan bar somewhere in the room. Then you and/or your partner can locate the victims using the thermal imaging camera. Now that you have found the victims, simulate opening a door by striking the halligan bar five times with the axe using the thermal imaging camera as your eyes. How coordinated are you? Have both you and your partner practice this technique before rotating to the other members?
Is it a puddle of cold water on the floor or is it an actual hole in the floor? What is your thermal imaging camera telling you? There are one of two things I can see happening with this scenario. First, you’re going to get your boots wet, or second, it is going to hurt like heck when you land on the basement floor because what you were looking at but didn’t understand, is a “black hole”. During my training, what works very well to help firefighters identify a black hole is using an old metal road sign or a thin sheet of plywood. Be sure the metal sign or plywood is at least 24 x 24 inches and it is a different temperature when placed on the floor where you are going to run some thermal imaging camera drills. See who takes notice and walks on it or stops and goes no further. This is a great way to help firefighters avoid possible injuries when using a thermal imaging camera when responding to a live-fire call.
Did you know that we do not have depth perception when we use a thermal imaging camera? Yes, we do have some limitations using thermal imagers which I will talk more about in another article. Try navigating up and down stairs when using a thermal imaging camera because although this sounds simple it takes practice. Use your basic fundamental techniques to navigate up and down flights of stairs as walking is not an option if you do not have visibility.
How about grabbing a couple of 5-gallon pails and partially filling them with hot and cold water or using some fuel jerry cans and placing them into your thermal imaging camera drill area. Simulate some hazmat scenarios by trying to determine liquid levels in the containers and even check out the propane level on the BBQ.
Here are a few other techniques we can work on. Walk around the station and look through the lens of the thermal imaging camera at the obvious electrical equipment such as computers, TVs, etc. The more time you spend behind the lens of your thermal imaging camera, the better you will be at understanding image interpretation.
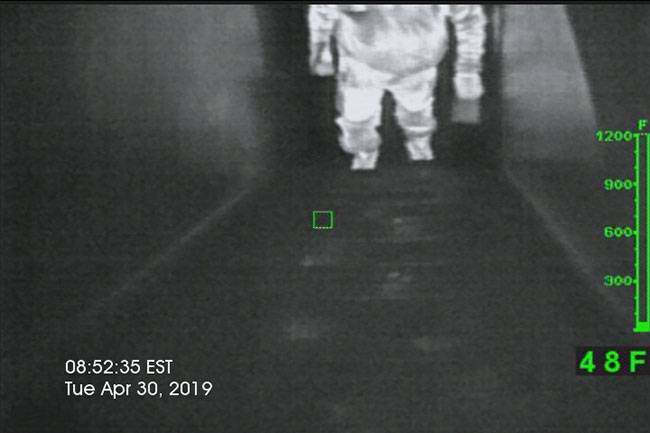
All thermal imaging cameras will display advanced fire fighting colorization at a higher temperature, but for right now we want to work only with black and white as 95 percent of the time that is what you will be working in. Black and white are two out of the three basic shades of colorization that your thermal imaging camera will display. White indicates objects that are hot or warmer, while black indicates objects that are cold or cooler, and everything else in between is shades of grey.
Take a look at this thermal imaging camera photo. It would be difficult to see the stairs if it wasn’t for someone walking up to them, which changed the temperature contrast. Use your basic fire fighting skills by always sounding the floor in front of you. A thermal imaging camera is a great addition to our arsenal of tools, but like all equipment, it takes practice, practice, and more practice to develop the skill of using the thermal imaging camera effectively.
Stay safe and practice often!
This article by Manfred Kihn was published in FireFighting in Canada Magazine in March issue 2021.